
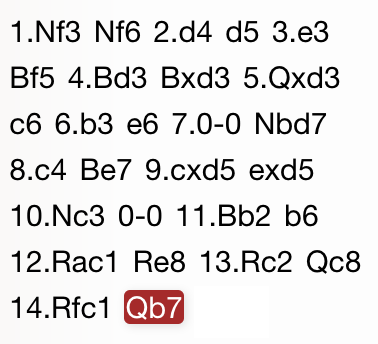
Above is the position after 14 moves of a Queen's Pawn opening. I have the White pieces and Black has just played Qb7. All my pieces are developed and I have a reasonable position in my opinion. I need to develop a strategic plan and the one I foolishly embarked upon involved moving my pawns to a3 and b4 to frustrate a c5 pawn move by Black. As it turned out, Black moved the pawn on b6 to b7 and this did not work in my favour. I'd buried my Bishop and, after I placed the Knight on c5 and Black placed the Knight on c4, my doubled Rooks were useless. Furthermore, the placement of my Knight was far less effective than Black's Knight placement. Black could exchange Bishop for Knight if I Knight became too powerful whereas White didn't have that option. White's buried Bishop was black-squared and Black's Knight was unmovable on its White square. From c4, the Knight bore down on e3 already under pressure from Black's Rook on the half-open file. Worst of all, the King side was completely undefended. Black is able to move his Rook up and across to the Kingside while the Queen and Bishop bear down as well. White's Queen cannot help in the defence.
My strategic plan was a sure loser against any competent player. A far better plan might have been to move the Knight on c3 across to the Kingside and keep bearing down on the half open c file with the two Rooks. This is not without it's problems too however, and so it's interesting to set the computer program (Stockfish) to analysis mode and see what strategy it comes up with. What it comes up with is interesting:

This approach is quite different and quite effective in maintaining the initiative for White. The above sequence of moves leads to the position shown below:

No comments:
Post a Comment